
Ceramic Tile Coaster Lasered


Hello, sorry for the long break. It's been awhile and I have been unsure if I should even bother with this, but after some thought - the answer was YES! So let me just jump right in. 

I may not have been posting, but, I have been creating! So I need to do more sharing.


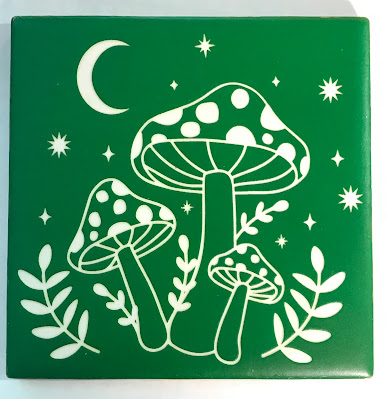
For this project I used a ceramic tile (4.25 in x 4.25 in). One can be purchased at any place like a Lowe's or Home Depot type store or redo one you already have.


I did some light sanding to this ceramic tile piece and then added some white gesso to prep this tile for painting. I used green acrylic paint for the top and gold acrylic paint for the sides and then sealed it with a clear matte finish, about four coats. 


I let everything dry and decided I would use my laser to add a design on top. Of course, it would be nice to paint something on it. So many ideas and elements that can be used, such as stickers, a fun paper collage, leaves, confetti. Have fun with it.

When I was done, I added another couple more coats of clear matte finish. I used Rust-Oleum Painter's Touch 2x Ultra Cover Matte Clear for this project. I really like this stuff.


I used the laser to cut some felt to attach to the back and then I was done.

Here it is . . . 


... What a fun piece. I think it came out super cute and it's ready to use. 

Thanks for popping in and until next time ... Happy Crafting!

-Maddie

#iplaywithfire #rustoleum #ceramictilecoasters #lasermade #glowforge


Comments

Popular posts from this blog

Can I laser on glass?

Conversation with myself:  Can I laser on glass? Well, I don't know, I haven't tried.  😂  It was my first attempt at lasering on glass. Next time I think I will make some minor setting adjustments. Depending on the design, I may want the image to be a bit clearer/sharper. But, since this design is a bit cute, spooky and going to be used as Halloween decor in our home, it works. The black roses were made using my laser, wood with acrylic paint. I know this is short but I hope it was sweet.  I'm not sure where October went, but I wish you and yours a fun and safe Halloween. Thank you for stopping by and,  Until next time, Maddie

Are we Sleighin' or Slayin' ?

I hope you are having a great start to this new year! As I was putting up Christmas I thought about how I had not shown this cute wood round sign. I love that it can go up in October and stay up through Christmas. This sign gives me all the Hallmark feelings.  I've been contemplating making a few of these to list. 🤔 I will get back to you on that.  Speaking of Christmas - Anyone feel like it just zoomed right by at a high rate of speed this year? I totally did.   Materials used: Wood, acrylic paint, gold, green and red foil paper and some rope and ribbon for hanging. Everything cut on my laser.   Thank you for swingin' by. Until next time, Maddie

Gold Leafing a Boutonniere

  It was my first time to do a boutonniere and I thought I would try adding some gold leaf foil to a few roses and see how they turned out. They came out very nice, I thought.  Some Supplies used:    Add the adhesive where you want. You can put as much or little as you'd like.  I was going for a bit of a drip on one of them.  I played around adding some gold leaf foil to a few leaves.  It was a big rose and a rather heavy one at that, so I decided to just do the one and leave the other rose out. It would have been too bulky. Using some floral tape, floral wire and some hot glue I put the boutonniere together. For a soft more vintage look I added some vintage lace I had on hand and finished it off with some ribbon.   This boutonniere was a hit and it was a fun piece to do.  Thanks for popping in, Maddie