I love making things on my laser . . .

I can't stop guys! 

I know I haven't been posting as much as I should, but boy I promise you, I do craft and use my laser often. I literally look forward to getting up and getting ready, just so I can jump on my laser or paint and put together something I cut.

I will be uploading some more pics to my Instagram account. I can be found @maddiemarrs2020.


Here are some projects I worked on for July 4th. 
               
The banner was made on 1/8" baltic birch wood. I used acrylic paints to paint the pieces other than the stars. For the stars, I used some silver foil leaf paper for a little pop. 


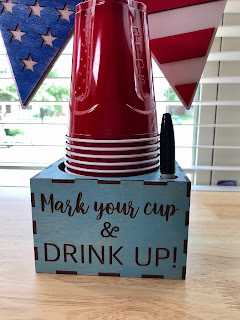
The Solo cup and marker holder - Done in 1/8" baltic birch and stained with blue stain and engraves. I currently have some listed in my Etsy shop. Not only is this fun to add to any event, its a great way to make sure your guests mark up their cups. Hopefully, one never has to lose another cup at a gathering again. ha! 


Round July 4th sign - Done in 1/8" baltic birch. painted using acrylic paints for everything but the stars, which was done with silver foil leaf paper. I made the flowers out of fabric and cut out some bigger star pieces for the center, to add a little detail. 


Here is a side view of the almost 12" round sign. The white stand was cut on white acrylic. 

Have I mentioned how much I love my laser! 


'Til next time, keep crafting!

Comments

Popular posts from this blog

Can I laser on glass?

Conversation with myself:  Can I laser on glass? Well, I don't know, I haven't tried.  😂  It was my first attempt at lasering on glass. Next time I think I will make some minor setting adjustments. Depending on the design, I may want the image to be a bit clearer/sharper. But, since this design is a bit cute, spooky and going to be used as Halloween decor in our home, it works. The black roses were made using my laser, wood with acrylic paint. I know this is short but I hope it was sweet.  I'm not sure where October went, but I wish you and yours a fun and safe Halloween. Thank you for stopping by and,  Until next time, Maddie

Gold Leafing a Boutonniere

  It was my first time to do a boutonniere and I thought I would try adding some gold leaf foil to a few roses and see how they turned out. They came out very nice, I thought.  Some Supplies used:    Add the adhesive where you want. You can put as much or little as you'd like.  I was going for a bit of a drip on one of them.  I played around adding some gold leaf foil to a few leaves.  It was a big rose and a rather heavy one at that, so I decided to just do the one and leave the other rose out. It would have been too bulky. Using some floral tape, floral wire and some hot glue I put the boutonniere together. For a soft more vintage look I added some vintage lace I had on hand and finished it off with some ribbon.   This boutonniere was a hit and it was a fun piece to do.  Thanks for popping in, Maddie

R you ready for a make over?

  The letter R.  She wasn't always this pretty and elegant.   Nope, she was dull and needed a little face lift. Here are a few photos of the process.   The feet seemed worn and ready to be replaced. I replaced them using black felt. Before I applied the gesso, I lightly sanded and gave the R a good wipe down with some rubbing alcohol.    Since I planned on using the blue foil paper, I decided to use blue acrylic paint as a base.   Foil paper being applied.   Final result! I used Liquitex varnish to seal it. Some materials used:     Thanks for stopping by, I hope you enjoyed.  If you are interested in this piece, please click on link. Decor Letter R Link: https://www.maddiemarrs.com/product/DecorLetterR-blue/41?cp=true&sa=true&sbp=false&q=false Until next time, Maddie